PACIFIC THEATER
User manual.
Technical characteristics
Basement dimension 27 X 33 X 6
Entrance dimension 8 X 6 X 3
Total land impact 253
Permissions Copy - Modify - Transfer

Step-by-Step Instructions
1. Open the folder and drop to the ground the object called Braw Pacific Theater Rezzer
2. Position the rezz box so that the arrow goes in the direction where you want the theater entrance to be placed.
3. Position the rezz box so that the arrow goes in the direction where you want the theater entrance to be placed.
4. Click on the rezz box and select rezz.
5. Wait a few moments, you will receive several messages in your chat and this is normal. The theater sets the customization system and verifies that your product is up to date.
6. Now place the rezz box in the right place to place the theater easily where you want it. Then, validate by clicking Finalize.
This action is irrevocable, make sure to be sure to position the theater correctly.
If you have validated the rezz while you are wrong of location, you must take again the theater as well as all the objects that compose it like the lights, the curtains, the armchairs. Be careful because some objects are invisible. (CTRL + ALT + T see to invisible objects)
7. Congratulations, you can now enjoy the theater.
Find all the additional information at the bottom of the page.
Lighting System
Wear the object of your inventory named Pacific Theater Lighting HUD
Make a simple click to activate one of the lights.
Keep pressing one of the buttons to display the settings.


Dimmer.
Enter a value between 10 and 10,000 in the info dialog.
The more important the value is, the more slower the dimming is.
Channel.
Everything is already set so that the channel matches. This option should not be changed.
Color.
Enjoy a predefined list of colors or add your own color backups. Your backups are limited to 8.
Changing the lighting color is instantaneous once the color is selected.
Click the arrow twice time to access the color customization

Selection once

Confirmation of selection
Selection once

You can set and save up to 8 unique colors.
Select twice time the desired number to assign a color to the RGB format.

The RGB allows you to easily assign a color to a script.
Red Green Blue
(Example)
Myred,255,0,0
Play with the color palette to find the right one.
Remember the RGB data that is written in the red box.
Use only this data to assign a color.

Access.
The Hud is not transferable but you can share it with your friends by dropping it in the world.
Set the access right according to each button.
Auto.
Select Auto so that the selected light in the theater will automatically turn on according to the night cycles of Second Life.
To make the most of the light system, make sure your graphics are high and the advanced lighting function is effective.

Doors Settings
The doors are by default accessible to everyone but you can change these settings by holding a left click on a door while making a slight movement of translation.


1.
2.
3.

Click and Hold by making a sliding

Make a slide movement between 1-2sec
Release
You can set basic with the menu access to Everyone, Group or Owner.
To activate the whitelist, from the menu, activate the "List Names".
Then, you must select the door, in its contents, open the access notecard and enter the name of the avatar in the place provided for this purpose.
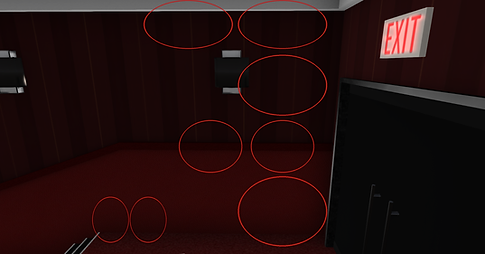
Themed Customization
You can change some textures from three places in the theater.
The audience hall, the stage and the backstage corridor.
Access to texture change settings is very discreet. To do this, you just have to identify with these indicative images.


2
1
3
4
5
6
7
8
Practical shortcut
CTRL+ALT+T
Display SL Alpha textures
1
2
3
1
Audience Hall
Left
Audience Hall
Right
Stage
Backstage Corridor
1
2
3
4
5
1. Bottom Wall Colors
2. Middle Border Colors
3. Main Walls Colors
4. Top Border Colors
5. Top Border Textures
6. Middle Border Textures
7. Stairs Parts Colors
8. Stairs Parts Textures
1. Bottom Walls Textures
2. Main Walls Textures
3. Ceiling Color Shade
1. Stage floor Textures
1. Backstage Floor Textures
2. Backstage Bottom Wall Textures
3. Corridor Borders Colors
4. Backstage Top Walls Textures
5. BackStage Ceiling Textures

1
1. Reception Walls Color Shades
