

User Manual


QUICK
INSTALLATION
Warning Notice
A quick installation will override the specific characteristics of your location, the technical capabilities of your property and the particular layout that would require some anticipation in the deployment methods.
We recommend that you refer to the different installation possibilities offered in order to best adapt to your objectives.
However, to practice understanding the modular system, the quick method is practical as a demonstration.
!
Click on the lower or upper part of the system, you will get a menu.
You should always choose to install the ground floor first. The menu offers you the different floor categories, select "Ground Floor" at the bottom right.
Wait a few seconds, make sure that your avatar is not above the modular system.
The ground floor has now appeared in the virtual world.
Right-click on the ground floor element (Yes really) and edit it to place it in the desired final location.
Without taking it from the inventory or deleting it, you can now position the modular system in a different location while keeping it close to the ground floor for further instructions. Its position will not matter in relation to the positioning of the floors.
2
Deployment
Follow the step-by-step guide
3
To add floors, click again on the modular system and access the "Floor" category.
Discover the description of the floors in the upper information panel. Choose the desired number and the floor will automatically appear above the lower floors.
Add as many upper floors as you want and in the desired order.
The speed at which the floor is added depends on your internet connection and the latency of the server on which you are located. If you notice significant latency when adding floors, it is recommended to add gradually, waiting a few seconds between each new element deployed.
Close the building by adding a roof that you will find in the main menu to the associated category.
You can also add basement elements in the associated category.
Be careful because if the upper floors can be organized in the desired order, the basement elements require that a precise order be respected so that the assembly is coherent.
Refer to the advanced guide to do this.
Congratulations! If you have reached all these steps, your hospital is ready. You can then take the modular system back into your inventory or keep it to one side in case you want to make a change.
Re-install the modular system and it will still be operational according to the configuration you have defined at your hospital. See advanced guide.
Stacking of floors
In the folder you received, drop to the ground the Braw World Hospital Polyfloors modular system.
Position the modular system as centrally as possible in the area you are limited by.
1
Drop it


Advanced Guide
Custom installation
The following situations relate to the hospital's deployment on the ground on a land. If the hospital is to be in the sky, some methods will be facilitated.
The light installation if deployed adds a significant cost in land impact.
Some additions are absolutely not mandatory and will be specified.

Before you begin the hospital's deployment steps, take the time to ask yourself three fundamental questions
The first is as follows
Where do I want to set up a hospital 60 meters long by 16 meters wide ?
Do I want this hospital to have basement facilities ?
How much land can I accommodate in terms of impact on my land for the hospital and its furnishings ?

Non-exhaustive examples of the land impact cost of different assemblies of the building.
(Land impact cost includes elevators and roof details - The calculated cost is approximate)
3 Floors
Operating Rooms - Hospitalizations Rooms - Radiology
No Basements
No lights
939 LI
5 Floors
Hospitalizations Rooms - Maternity
Fake Floors x3
No Basements
No lights
1021 LI
6 Floors (all)
Empty Floor - Fake Floor - Operating Rooms - Hospitalization Rooms - Radiology - Maternity
No Basements
No lights
1344 LI
6 Floors (all)
Empty Floor - Fake Floor - Operating Rooms - Hospitalization Rooms - Radiology - Maternity
3 Basements
Full lights
1676 LI
To make a building 70 meters high, count about 2000 Land impact. Knowing that this has been calculated with all 6 floor categories as well as many fake floors.
To make an basement parking in a minimum of land impact, count 147 LI with the following elements : PB A and PB C (N1)
Start setting up your hospital !


Advanced User Manual
1
In the folder you received, drop to the ground the
Braw World Hospital Polyfloors modular system.
Position the modular system as centrally as possible so that it does not extend beyond your neighbours and to avoid any display problems if it appears halfway outside the sim border.
Drop it

The object appearing is composed of two main elements, one of which has a central point allowing the first element (Ground floor) to appear above the rezzer. That is why when you want to display it at a specific point, it will not be the main element that appears at the desired place but the average between the two components of the modular system.
It is important to be aware that the final positioning is not decided by the rezzer but by the instructions afterwards.
2
Now you have the simplest and most intuitive modular system available on SL for the fast and efficient addition of large building floors.
Thanks to the object you have placed, you will be able to add as many floors as you wish and in the desired order. (Except basements, more information below)
Deployment

The modular system operates as a menu allowing access to all the functionalities allowing the addition of floors and the adjustment of several options.
When you click on the main menu, you have direct access to the 4 different floor categories. Visual symbols can help you quickly grasp the type of floor it represents.
Ground Floor
This is the first element you will need to install in order for the modular system to work, it is not possible to install any other element than this one in the first place because it is the brain of the modular system. It is thanks to the ground floor that the system will understand how to calculate the distances between all the floors so that the interlocking matches.

Floor
These are all the upper floors, there are 6 different versions.
It is possible to add the same floor type several times by selecting its number and clicking on it again when the menu reappears.
There is no need to worry about the order in which the floors are added.
In the menu description, you will find a short description of the type of floor it represents. To find out exactly what a floor is, go to the website's Overview.
For ease of use, it is recommended that you position the modular system a few meters above the ground.

The meaning of the floor titles is divided into 4 different parts.
1) The identification number
It allows you to display the corresponding floor.
2) The floor category letter
This is the floor type : F corresponds to Floor, B to Basement, GF to Ground floor and R to Roof.
3) The dedicated floor letter
A predefined order is established for all floors linked to a separate category, which is why for floors, it ranges from letter A to F. These letters are mainly used to establish a logical order for the modular system.
4) The description of the floor.
This provides a quick description of the floor type.
Example
1. F - A Empty Floor
This floor title is divided in this way :
1 = The identification number
F = The floor category letter
A = The dedicated floor letter
Empty Floor = The description of the floor.
To allow basements to be added to your property, you must have the right to terraform to dig the ground to the dimensions of the hospital.
The possible depth will depend on the height of the water determined by the estate.
If the depth is not sufficient, if you encounter the water too early, we recommend that you contact the Estate administrator so that he can reduce the height of the SL water. This solution is not always possible depending on the height of the terrain initially defined.
Nevertheless, it is necessary to have advanced skills in some SL editing tools.
There are three types of basements, two of which have a different version (N1 & N2)
It is important to follow a strict order to ensure that the casing is consistent.
It is possible to add an unlimited number of basements except that you will quickly be limited by the depth of your property if you decide to assemble the hospital on land ground.
Solutions will be greatly facilitated if the hospital were in the sky but, it must be remembered that it is quite possible to have a basement under the ground in excellent conditions depending on how you will proceed.
To have an underground car park, you must first know that in the logic of assembly, you need a minimum of two basements to complete it.
Find below the different assembly possibilities offered :
(The first element to be installed must always be "1. PB - A Basement Entrance")

Basement
The basement allows vehicles to enter and circulate to all the added basements. There are two types of vehicle entrances, the emergency entrance, which is for ambulatory vehicles only (left), and the civilian entrance for visitors and staff (right).
Find all the information on the different basements in the overview of the website.
After installing the ground floor, in the menu, click on the "Basement" category and add element N°1 first
Then follow the order of the numbers carefully
Minimum number of basement floors
(1) PB - A Basement Entrance
(4) PB - C End Basement (N1)
3 Basements
(1) PB - A Basement Entrance
(2) PB - B Basement central (N1)
(5) PB - C End Basement (N2)
4 Basements
(1) PB - A Basement Entrance
(2) PB - B Basement central (N1)
(3) PB - B Basement central (N2)
(5) PB - C End Basement (N2)
6 Basements
(1) PB - A Basement Entrance
(2) PB - B Basement central (N1)
(3) PB - B Basement central (N2)
(5) PB - C End Basement (N2)
(3) PB - B Basement central (N2)
(3) PB - B Basement central (N2)
This model allows for unlimited addition


!
Depending on the performance of the server, it is possible that the physics assigned to the basement elements may not be applied correctly due to improperly synchronized loading. To fix this problem, make a simple selection of the basement in question : Right click > edit, wait a few seconds > and then close the edit mode.
!
The modular system will only prohibit you from putting an element underneath the basement of the "C end" type.
This means that it is your role to follow the logical order because in case of assembly errors, no reports will be made.
Roof
There is currently 1 roof version with 3 different variations.
This is the last element you will need to add. Even if it is still possible to add basements again afterwards if the basement type "C End" has not yet been added.
It is strongly recommended not to add the roof until you have read the detailed section on the modular system below.

However, if you are sure you have all the floors you want, then all you need to do is go to the modular system,
left-click on it > Roof > and choose between the three different options.
Descriptions of the different versions and how to choose the one best suited to your wishes.
1. Roof Classic
The classic roof does not have runways for helicopters. This can allow you to add custom roof details such as vents, antennas or other typical details.
2. Helicopter Tracks
Version 2 allows you to add two helicopter runways with additional details such as a light device, guardrails and safety grids.
This is the ideal version if there are used floors under the roof, the complete light system if added has only a slight influence on the other lower elements.
See below for additional details on lighting systems.
3. Helicopter Tracks FX
Version 3, the FX is similar to version 2 in terms of detail except that there is a difference in light effects.
Projection effects on the light repeaters of the tracks as well as on the lighting of the tracks are more realistic.
However, this requires advanced graphics to distinguish these effects.
Be careful, it is highly recommended if you decide to use this version to have a minimum of two
"2 B Fake Floor" floors under the roof.
Since the game engine makes it difficult to "seal" the projection light, it is necessary to effectively hide this graphic inconsistency with unusable floors (Remember that this type of floor allows stairwells and elevators to be used).
3
The modular system also called Polyfloors by the edition it represents, has been specially designed for large infrastructures. It has certain specific features that greatly simplify the layout of floors and their adjustment.
Copyright protection does not allow the Polyfloors system to be used on products that are not from the Braw shop.
This section will teach you more about how this system works and its subtleties.
Modular adjustment
MODULAR
SYSTEM
POLYFLOORS
This product being eligible for free updates, if you have received bugs, or any other inconsistent findings, contact us so that we can fix them.
However, be careful to interpret its operation carefully in order to rule on any technical problem.
As the hospital floors can be modified, it is also strongly recommended that you respect certain instructions and be vigilant during your technical handling :
-
Not to change the title of all floors objects and their descriptions
-
Not to change the size of the floors
-
Not to unlink the floors and modify their central element.
Otherwise, the operation of the modular system may be affected or may no longer function at all.
The modifications you make to the modifiable elements are your responsibility, we cannot provide technical assistance if you acknowledge that you have modified the conditions to be respected above.
These 3 recommendations are no longer valid once the entire building has been permanently frozen. (See below)

Some of the information already specified above is repeated.


1. Menu Access
1 A. The two types of access
To access the modular system menu, simply click on it. To be more precise, you can click on the lower and upper part of the front part of the object.
There is a second way to access part of the modular system. For this purpose, it is not necessary for the modular system to be dropped.
It is possible to access the advanced settings through a written command.
The default command is "/1 menu".
You will need to change the above number depending on the channel choice. (See 1 D communication channel)
When you have finished adding floors, the modular system can be taken from the inventory without any problems.
It will just have to be re-rezzed if you want to make floor modifications.
1 B. Menus and sub-menus
All menus and submenus use generic buttons :
- "←" button
This button is only displayed in the submenus. It returns you to the previous menu.
- Button "× Exit"
This button allows you to exit the menus "cleanly". Use this instead of the "Ignore" button.
- Check symbol "✔" in the button labels
In some menus, this symbol precedes the label of a button when the corresponding option is enabled.
The menus (and system messages) are in French if the language of the user's viewer is in French. If it is another language or if it is not recognized, they are in English.
When you take the modular system in the inventory, the recorded language is preserved. To reset the language to its original state, reset the scripts in the modular system to the object content.
1 C. Access rights
It is possible to allow access to the rezzer to members of a group or to certain users.
By default, only the owner has access to the rezzer menu. However, you can allow access to other people. To do this, click the "☸ Settings" button and then "Access".
- Some users can be defined to access the rezzer menu. Called the white list, this list can contain up to 20 users. To add a user, click on the "Add" button (this button no longer appears if there are already 20 registered users) and then enter his name (Ex : sandrine runo or aimerik). The case doesn't matter. The names will be displayed in the menu label. To delete a user, click on "Delete" and enter his name (this button only appears if there is at least one registered user).
NOTE: The white list is automatically activated as soon as there is at least one user. This means that only white list users will have access.
IMPORTANT: the white list always has priority over group access. If a user is in white list and group access is enabled, he or she will not need to display the group.
- To give access authorization to members of a group, click on the "Group" button. Members with the group defined for the rezzer will then have access. Click on "Group" again to disable access.
NOTE: Authorized persons have access to all rezzer options, except access management (the "Access" button does not appear) and advanced settings (adjustments, freeze...)
In addition, any messages will only be visible to the owner.
If, for example, you, as the owner of the hospital, have to be absent, you can delegate the possibility to someone close to you to add floors if necessary. The owner's permission rights will then be very useful to remove the roof or other element that has become undesirable.
This feature may therefore be useful in some cases, so why if you want to delegate some of the features of the modular system in the future, we recommend that you preserve the object instead of keeping it in the inventory. You can position the modular system anywhere you want as long as it is on the same sim as the ground floor.
1 D. Communication channel
In the case where several modular Polyfloors buildings are on the same sim, even several hospitals, it is then necessary for the modular system to know how to separate them.
Before installing an element from the rezzer, it is necessary to check the channel used for the building to be assembled. This channel is used for the various communications between the ground floor and the floors for the installation and avoids possible conflicts with other buildings with the same system.
Summary of the Polyfloors modular system


2. Adding floors
2 A. Rezzing of floors
To install the ground floor, click on "★ Ground Floor". A numbered list appears in the menu label with the names of the available items. Click on the numbered button corresponding to the item. Do the same for other elements such as floors, basements and roofs. If there are more than 10 items available for the same type, click on the ">" button to move to the next page.
You must of course respect an installation order and certain conditions depending on the elements to be installed :
-
The ground floor must always be installed first
-
You can't install a floor on a roof
-
You cannot add a basement below a last basement
In case of error, you will be informed in the chat and the rezzed element will be destroyed.
In the event that floors have not been installed in the right order, it is not possible to reorganize the order automatically. To change it, manually delete the desired items and then use the "Adjust" option of the ground floor menu > Settings > Advanced > Ajust (see "1 A. The two types of access").
Then reinstall the elements from the modular system.
2 B. Change order of floors
2 C. Adjustment Auto/Manual
Auto
It may be necessary to readjust the floors if the ground floor has been moved, rotated or if one or more floors have been removed. To do this, click on "Adjust". This button only appears if there are already floors installed. The floors will then be repositioned according to the new ground floor location.
The adjustment is almost instantaneous, depending on the performance of the server you are on.
Remember then that to move the entire building, you only have to move the ground floor and make an adjustment in Settings > Advanced.
NOTE: The "Adjust" button no longer appears if the building has been frozen (see "2 D. Freeze the building").
Manual
The manual control was first created during system development to test the effects of changing the Z coordinates (the height axis).
This is a purely optional command but will help you if you are not able to slightly change The Z coordinate location of your hospital's ground floor.
We recommend that you always use automatic adjustment. In case of offset problems, see "3 C. Problem Solving".
This channel must of course be identical for the ground floor and the upper floors. To change it, click on the "☸ Settings" button, then "Channel" and choose a number between 1 and 10 (1 is the default channel). Any channel can be selected if :
-
There are no Polyfloors buildings with the same system on the sim
-
Scripts from other buildings with the same system have been removed (see "2 D. Freeze the building")
NOTE: Once the building is installed, its channel can be changed later from the ground floor menu
(see "1 A. The two types of access")

The ground floor menu displays the buttons for the different types of elements that can be installed: ground floor, upper floors, roofs and basements. If one or more buttons do not appear, it means that the corresponding elements do not exist in the rezzer content. (Add-ons)


Otherwise, here is how the manual control works:
The rezzed elements may be incorrectly positioned in the Z axis due to the large volume of the objects. To correct a possible position defect of the last rezzed element, click on the "+" or "-" buttons on the menu to shift the element by ± 1 mm. If the element is a floor, the "+" button moves it upwards. If it is a basement, the element is moved down.


2 D. Freeze the building
Once the building is permanently installed, it is recommended to freeze the building for two reasons:
-
To delete the scripts used by the system since they can be sources of consumption on the server (especially if there are many floors) and therefore, to contribute to the lag.
-
To remove the central root of all floors. The central root is a very thin invisible object implemented at the center of the geometry of each floor. Whether it is the ground floor, the floors, the basements and the roofs.
The disadvantage is that if the building is not frozen, this object will interfere with the avatars (physics) that will circulate in the corridors and different rooms on the floors.
The freeze functionality acts on these two recommendations, that of removing the scripts allowing the modular system to work and removing the roots of the floors.
To do this, click on the "Freeze" button. The "Freeze" submenu offers 2 choices:
- "All": all scripts will be deleted. It will no longer be possible to adjust the building or install other elements.
- "Partial": only the ground floor script (main script) will be kept. The building can no longer be adjusted, but you can remove an end element (such as a roof or last basement) and install one or more new elements.

Settings > Advanced > Freeze
Or local chat : "/(channel number) menu" > Freeze
As soon as the freeze action has been done, contextual notifications will appear (at the top right of your window) in order to ask you for authorization for unlink the roots of all floors.
Your agreement is required for each floor, individually. That is why you should make sure to check your notification panel carefully in order to accept all unlink authorization notifications.
3. Support

3 A. Error messages
Error messages may appear in the chat. These may include installation order warnings, limitations (such as the maximum height position of the building limited to 0 to 4,000 m) or temporary positioning problems related to the simulator. In case of an abnormal positioning problem, use the "Adjust" option to try again. If the problem is recurrent, see 3 C. Problem Solving.
3 B. Problem Solving
Problems of offset between floors
The conclusion after many tests is that Second Life is not suitable for importing very large objects since problems of offset between linked objects can occur.
It is in complete transparency that we point out that although the modular system is very efficient for easy and quick assembly, it will never be perfect in terms of spacing between floors.
Although this is an almost imperceptible detail, two solutions exist to reduce the problem.
Understand the problem to better correct it.
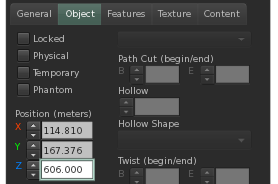
The problem lies in the interpretation of the decimal coordinates of the height axis (Z).
The ground floor is the key element that will decide whether the delay will be pronounced, minimal or non-existent.
An informative feature has been added to the modular system to let you know whether or not it would be recommended to adjust the coordinates of your ground floor.
Always try to position the ground floor height to round decimal values.
For example, if you have positioned the ground floor at an altitude of 1.756 meters, you should round up to 1 meter.
If you are at 1487,562, then prefer 1487 meters. The basic values largely correct the offset problem (visually speaking)
After manually adjusting the ground floor height, click on an automatic adjustment from the modular system menu.
All bug fixes and improvements will be posted here.
First Version 1.20 Available
3 C. Updates

.png)


Additional Details


ELEVATORS
LIGHTS
ADDITIONAL
SETS
Deployment of the 4 elevators and configurations
Addition of all lighting installations and their operation
Location of all additional rezzers and their characteristics
ELEVATORS

The World Hospital has 4 elevators.
These are located on the map below :
Central Elevator
Emergency Elevator
Reception Elevators
The emergency elevator facilitates access for medical staff and patients requiring immediate care.
It is the largest elevator since its dimensions allow to accommodate stretchers.
The central elevator can be a service elevator. However, if it is used by hospital visitors, it will relieve the elevators in the reception area.
There are two reception elevators or also called home elevators.
There are two of them and they work on the same controller to optimize their operation.
They are intended for use by the public.


All the floors you have added already have elevator doors. Thus, the alignment is perfect when you assemble your building. However, elevator cars are not rezzed by default since they are elements that should not be linked to the floors.
The configuration of the elevators has been made as easy as possible so that the user can make the elevators operational as quickly as possible. However, it should be noted that some actions must still be taken to make this possible.
These are currently the most realistic elevators in Second Life, they work logically and are suitable for hosting avatars in an immersive environment.
To configure the elevators, three controllers are at your disposal giving you access to a web page.
Be careful, however, we recommend that you buy the personal version of these elevators because otherwise, the configuration of the controllers will be limited to only changing the names of the floors.
By purchasing the personal elevator, you will be registered in an elevator brand database allowing you to access the configuration system with all adjustable settings.
It is particularly recommended to obtain this version so that the emergency elevator door can be opened according to the recommendation below in the elevator configuration guide.
In addition to this, getting the version of the elevator independent of the hospital will allow you to add "delimiters". These allow you to add new elevators above those that have reached the maximum number of floors. See the elevator guide on the brand's website.
(Note that this additional purchase will not require you to reinstall the elevators, no additional installation is required)
-
Rez the elevators
-
Configure them
Elevators installation in two steps :
1. Rez the elevators
It is from the ground floor that you will be allowed to deploy the elevators as well as additional elements such as the intercom (a phone receiving emergency calls from the elevator cars located in the security station) and doors that could not be linked directly to the ground floor.
These are the two doors located in the ambulatory emergency access.
Most of the additional rezzers are hidden inside some walls. That's why it can be useful to have a good command of the movement of the Second Life camera. The trick is to get closer to the area in question and play with the ALT GR key + left click + mouse wheel to zoom in.
Find the elevator rezzer using the map below:
It is a green cube. Once found, click on it and on the menu, choose "Rez".
Wait a few seconds until the elements are correctly positioned, then press the rezzer again and "Finalize".


Additional door
Additional door
The intercom is located above one of the controllers. It can be moved independently.

2. Configure them
Now that the elevators are automatically positioned and you have validated the rezzer, go to the security station on the ground floor and stand in front of the three controllers.
Start by configuring the grey controller, it concerns both reception elevators.
- Click on the green button of the controller named "Setup".
You will be taken to a configuration web page. Scroll down to step 4 and press "Initialize" for the system to start detecting the hospital elevators.
(If you have placed the World Hospital on the same sim more than once, you should consider renaming the name of the object in the elevator shafts so that there are no conflicts)
In front of the configuration web page, wait about 30 seconds and the list of elevators available for a configuration will then appear.
- Select with a left click the elevators named "Home elevator 1" and "Home elevator 2" and press the button below called "Connect & Configure".
You are now in the control panel of these two elevators. We encourage you to change the names of the floors so that they are specific to the use you will make of them and so that they are in a logical floor order. Indeed, if you have basement parking, it will be the last basement that will be considered by default by the elevators as floor N°1.
It will then be preferable to consider the ground floor as the first number.
If you have as recommended above the elevator on the seller's shop, you have access to interesting settings such as speed, type of mechanism, waiting time and many more.
As soon as your configuration is satisfactory, click "Save & Start
Your reception elevators are ready!
The three controllers are linked to the ground floor. Color coding can help you identify what elevators are connected to.
The grey corresponds to the connection to the two elevators in the reception area.
The orange corresponds to the central elevator and the red to the emergency elevator.
You can make an individual selection in edit mode to check the name of the object that should match.
- Repeat these steps by selecting the second orange controller in Second Life (central elevator).
It is recommended to use the type of door opening called "Split" for the reception and central elevators during configuration.
With regard to the configuration of the emergency elevator, it will be important to indicate a "Sideways" door opening, which will ensure that elevator doors do not protrude from the wall when opening.
Remember that you can restart the configuration from the controller's green button as many times as necessary.
LIGHTS
Each floor has a ground floor of lights.
This one is therefore not mandatory but once added, it increases the ambient realism.
Be careful though, as this adds up an additional number of prims.
Count on average 150 LI to add lights per floor and 13 LI for the roof.
The light system consists of three elements: visual lighting, invisible lighting and light switches.
For all floors, you therefore have a control allowing you to control all the lights per floor.
The light switches on the ground floor are shown below :


This is the main controller, it allows you to turn on all the interior lights.
It is the external switch on the emergency entrance roof for visitors.
This is the XL roof switch for ambulatory emergencies. This only appears if the XL roof is extended. See below for additional content.
It's the controller of the external reception roof.
When it is on, it lights up the entrance of the hospital.


The rezzer of the lights is at the main entrance of the hospital, at the foot of the right column inside. Wait 1 to 2 minutes for deployment. You can then validate the rezzer.

All the upper floors have two similar switches controlling all the main lights (corridors, stairwells...)
These switches are always in the same place: In the staff stairwell and in the civilian stairwell.


For the roof, the switch is located next to the emergency elevator.
The rezzer is hidden below the central root of this floor.
For a visual cue, activate the invisible mode with the CTRL+ALT+T keys.
It can be difficult to spot because it is a rezzer on a flat surface. Use the camera shortcut mentioned above.
Be careful not to confuse the lights of the basement parking with those of the upper floors.
Basement parking lights are lights that cannot be controlled, they are static and illuminate continuously. See additional content below to deploy them.
To appreciate the lighting installation, it is necessary to have advanced graphics options including advanced lighting effects. Lights can be a source of lag depending on the performance of your computer.
Working of the light system
To turn on the light, simply left-click on the switch. At the beginning of the installation, it may be necessary to press the switch twice to synchronize all the corresponding lights.
To turn off the light, simply press the switch again with a simple left click.
Depending on the settings, the light may take a variable amount of time to turn on thanks to the dimmer system.
The use of the light system allows all the lights on a floor to be controlled. This means that a floor has a single channel. (see channel table below)
By default, the lights automatically turn on and off according to the Pacific time (SL time).
It is possible to disable this option.
The invisible objects deployed with the rezzer make it possible to complete the coherence of the lighting environment of the floors. However, you can manually move or delete each of the arranged lights.
There are therefore two types of channels for lights, general lighting and individual lighting.
When it is night and the automatic lighting is activated, only the general lighting will be activated. That is, the lights of the main access points such as corridors and stairwells.
Individual lighting concerns offices, patients' rooms, bathrooms, delivery rooms and some specific rooms.
By default, the general lighting switch can only be used by the owner. With regard to individual lighting, by default all visitors can turn on the light in a specific room.
This setting can also be changed.

To activate the settings, instead of making a quick left click, hold your left click on the switch for 2 to 3 seconds and then release it to appear.
You will get a menu with 5 different settings.
Remember that it is strongly discouraged to change the channel numbers already set for the hospital. See channels below.
Access the light system settings
Play with the color palette to find the right one.
Remember the RGB data that is written in the red box.
Use only this data to assign a color.


Dimmer
The dimmer allows you to have an on/off phase on a progressive transition.
The typical example of the use of the dimmer is in a movie theater. When the film starts or the film ends, the lights gradually turn on and off for a better visual experience.
This principle can also be adjusted for the hospital so that the lights can be switched on with the appropriate speed. This is a purely optional feature, a quick or even instantaneous transition is possible.

Access
click for more than a second on the object of the switch to open the menu and choose "Access".
- Owner
Only you have access to the switch.
- Group
Only people with the group associated with the object have access.
To define the group of the object:
1. Right-click on the switch and choose "Edit".
2. Select the "General" tab in the edit box.
3. Locate the label "Group:" and its button on the right.
4. Click on it and choose the name of the group from the list.
5. Confirm your choice and close the edit box.
6. Click on the "Group" button in the "Access" submenu of the switch.
- Everyone
Everyone has access.
Auto
Each switch can be automatically activated according to the day/night status of the simulator (lit if it is night, off if it is day). To activate this option, click for more than a second on the object of the switch to open the menu and then click on the "Auto" button. Click the "Auto" button again to disable the automatic mode.


It is possible to give an atmosphere to your lighting atmosphere.
To choose a color, click for more than a second on the object of the switch to open the menu and then click on the "Color" button. The color menu is organized into 3 sub-menus:
- 1/4 tone colors (8 predefined shades)
- 1/2 tone colors (8 predefined shades)
- Custom colors (8 programmable colors)
The 1/2 and 1/4 tone colours are basic shades: white, cyan, blue, magenta, orange, yellow, green and red. The 1/2 tones correspond to 50% brightness and the 1/4 tones to 75% (except white to 100% in both cases).
To create or modify a custom color, go to the last submenu and click on one of the buttons numbered 1 to 8. Once the button has been selected (symbol "✔" present), click it again to open the input box and enter the name of the color of your choice followed by the 3 values of red, green and blue (RGB: from 0 to 255). The name and the 3 values must be separated by commas.
➨ EXAMPLE : Dark green,0,128,0
NOTE: When a color is created or modified, it is immediately transmitted to the luminaire.
The list of color names and the corresponding RGB values appear in the menu label.
Color
Channel
Channels are used to synchronize lights with each other. Each channel can be specific to a specific floor or room.
Empty Floor
101
Fake Floor
102
Ground Floor
Roof of ambulatory emergencies
Emergency Roof Reception
Main reception roof
Intensive care
100
800
801
802
803


Operating Rooms
Room 1
Room 2
Room 3
Room 4
Room 5
Bathroom 1
Bathroom 2
Bathroom 3
Bathroom 4
103
301
302
303
304
305
306
307
308
309
Hospitalization Rooms
Room 1
Room 2
Room 3
Room 4
Room 5
Room 6
Room 7
Room 8
Room 9
Room 10
Room 11
Bathroom 1
Bathroom 2
Bathroom 3
Bathroom 4
Bathroom 5
Bathroom 6
Bathroom 7
Bathroom 8
Bathroom 9
Bathroom 10
104
401
402
403
404
405
406
407
408
409
410
411
412
413
414
415
416
417
418
419
420
421
Radiology
Lab
Office
MRI room
X-Ray room
105
501
502
503
504

The rezzer of the lights on the upper floors is located in the central elevator. It will be necessary to deploy the rezzer for each floor for a full light building.


Maternity
Delivery Room 1
Delivery Room 2
Delivery Room 3
Delivery Room 4
Bathroom 1
Office 1
Office 2
Office 3
Nursery
106
601
602
603
604
605
606
607
608
609
Roof Classic
Roof Helicopter Tracks
Roof Helicopter Tracks FX
107
107
107
ADDITIONAL SETS

Ground floor
Roof of Ambulatory Emergencies
The ground floor has additional content for ambulances to be housed under a roof.
There are two versions of this roof to choose from, the M or XL version.
Both elements have a specific light installation that can be deployed if desired.
Depending on the version chosen, the rezzer of the lights and the light switch are not positioned in the same position.


The ground floor of the XL emergency roof light installation is located in the emergency elevator shaft.
This is the XL roof light switch
The light switch of the M version is located directly on the roof column. The one in which the rezzer of the light system is also located.
In the central elevator shaft, you will find the two available versions of the ambulatory emergency roof.
On the left the M version (Classic) and the XL version (Very large) on the right.
M
XL
Roof
Adding details (helicopter runways, barriers...)
To make the different versions of the roof visible, it is necessary to install them thanks to the rezzer located inside the elevator shaft of this floor, on the ceiling.

Parking Basement
Lights, signage, various decorations...
To make the different versions of the roof visible, it is necessary to install them thanks to the rezzer located inside the elevator shaft of this floor, on the ceiling.


Entrance
Central
End part
Located close to the center of the parking, find the rezzer under the foot of the central column. It will also make it possible to complete a missing door.
The rezzer is located below the central root which can be displayed by activating the previously mentioned invisible mode.
The rezzer is also located below the central prim.
Doors Configuration

The doors are by default accessible to everyone but you can change these settings by holding a left click on a door while making a slight movement of translation.


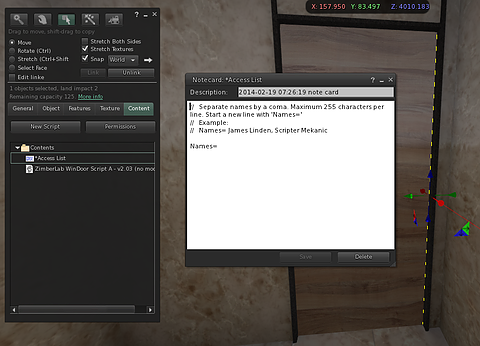

1) Click and Hold by making a sliding
2) Make a slide movement between 1-2sec
3) Release

You can set basic with the menu access to Everyone, Group or Owner.
To activate the whitelist, from the menu, activate the "List Names".
Then, you must select the door, in its contents, open the access notecard and enter the name of the avatar in the place provided for this purpose.